Olaplex is a new hair treatment system that performs miracles on damaged color treated hair. You may have seen the Olaplex hashtag on photos of fashion colored hair on Instagram, or advertised as a treatment package at your hair salon.
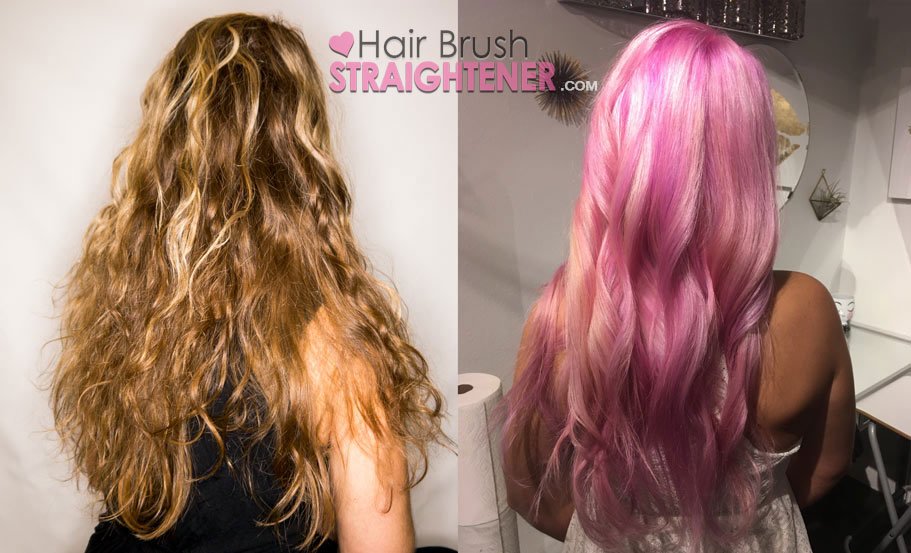
As I recently made a bold move to get the pink mermaid hair of my dreams, I thought it would be the perfect opportunity to test it out! Keep reading our Olaplex at home kit review to see if this stuff really works!
What is The Olaplex At Home Kit?

Olaplex is very simply is a hair treatment system that repairs damage done to hair from intense hair coloring and bleaching. Olaplex works to link broken bonds in the hair during and after chemical services making them stronger than they were before treatment.
The cool thing about Olaplex, is that the 3 step system begins during the hair coloring process. Instead of coloring hair as usual and just trying to undo the damage after the fact, Olaplex works with your hair throughout the entire coloring process.
Olaplex is currently offered at many salons throughout the world, however it is available for purchase and can be used at home! You can purchase an Olaplex at Home Kit at a variety of online retailers! Hallelujah!
How Does The Olaplex At Home Kit Work?
- No. 1 of the 3 step system is called the “Bond Multiplier”. This formula is to be mixed in with the hair color or bleach used during the coloring process. Olaplex says that it reconnects broken disulfide sulfur bonds in the hair. No.1 is meant to help mitigate damage during the color, lightening and relaxing process, however it can’t stop all the damage- thats where No.2 comes into play.
- No.2 of the 3 step systems is called the “Bond Perfector“. It is applied to hair directly after the hair dye/ bleach is rinsed completely from hair. No.2 keeps working on colored hair to find more single sulfur hydrogen bonds and cross links them back together without color, lightener or relaxers working against it.
- No.3 and the final step of the Olaplex system is the “Hair Perfector“. It is an at home treatment meant to be used prior to your usual shampoo and conditioning sessions. It works to keep the damage at bay, and your hair looking smooth and healthy after the coloring process.
My Experience Using The Olaplex At Home Kit
I had some pretty lofty goals for my first experiment with a fashion hair color, and I knew it would take an all over bleach lightening session first to take it to my #mermaidhairgoal level. If you have been bleaching at home for a while, you can probably pull this off yourself, but since I was doing all over foils for the bleaching process I asked a friend along for an extra set of hands.
Although my hair was already fairly light to begin with, it was pretty damaged from years of hair coloring and frequent hot tool use. Especially from my hair brush straightener! I had high hopes that the Olaplex would make my hair look better than before the coloring treatment, but I knew that was a tall order. I ordered this set online which includes:
- (1) 17.75 fl oz bottle of No.1 Bond Multiplier
- (2) 17.75 fl oz bottles of No. 2 Bond Perfector
- (1) 3.3 fl oz bottle of No. 3 Hair Perfector
- (1) Plastic Measuring tube
Using The Olaplex System
Step 1: Olaplex No. 1 Bond Multiplier
I began by mixing the No. 1 Bond Multiplier formula with my hair bleach. Since I have long hair, I followed the Olaplex directions which say if you are using 1-2oz (30-60g) of lightener powder (not including developer), add 1/8oz (3.75ml) Olaplex No.1 Bond Multiplier. Unlike some other treatments that get added to bleach, you don’t need to bump the developer or increase the processing time when using Olaplex! I foiled my hair completely, and after it had processed we rinsed it all out using cold water.
I noticed pretty immediately that my hair felt quite different than the last time I had bleached it. My hair was already softer, and did not feel all straw-like. My hair strands were sticking together more during the rinse process than they usually do right after coloring. This indicates it was not as dried out from the bleaching as it had been before. I was pumped to get on to the next step of the process!
Since I was using a toner after the bleach, I read carefully what was to be done next because it depends on whether or not the toner is to be shampooed out. This can vary depending on what brand of bleach/ developer you use so pay attention and plot accordingly. Since I was instructed to shampoo my toner out, I applied toner as normal, allowed it to process, and then rinsed it out, using cold water.
Step 2: Olaplex No. 2 Bond Perfector
Next I applied the No. 2 Bond Perfector to all my strands, and made sure my hair was properly coated. How long to wait before rinsing depends on your hair, but it should be kept in for a minimum or 10-20 minutes. I left my No. 2 treatment on for about 30 mins, and then shampooed my hair as normal. While still wet, I combed the strands with a wide tooth comb to prep for the fashion color.
I was happy to see that my hair hand very minimal breakage despite the fact that it had just been through so much damage! Usually at this step in the process I would have a comb full of broken ends- but not with the Olaplex at home kit! I could see the Olaplex was already working wonders on my hair, and I couldn’t wait to see the final results.
Next we applied my fashion hair color over top of the bleached hair. We used a magenta color semi permanent dye, and applied the color to individual strands because I wanted more of a dimensional look than an all over color. After rinsing out the dye, washing, and conditioning I was super excited to get to the styling process!
I was happy that my hair felt more healthy than it’d ever been following a coloring treatment. Normally at this step in the process I would be a little concerned about all the breakage I would see with my hair if styling with heat tools directly following a bleaching session- but not today! I was able to blow dry, with a round brush, and style with a curling iron with very little breakage at all!
It is truly amazing how much healthier the state of my hair is compared to the previous times I had performed intense color treatments. Not only was I thrilled to have the pretty pink hair color I had always dreamed of, but I was super happy to have done it without all the negative side effects on unhealthy hair!
Step 3: Olaplex No. 3 Hair Perfector
The final step in my Olaplex journey was to use the No. 3 Hair Perfector right before my first shampoo session. I knew that my hair color would fade a little during the first wash, so I was only looking forward to the process so that I could test out the Olaplex No.3. I applied the treatment to my hair and left it on four about 45 minutes before stepping into the shower.
The tricky thing about having fashion colored hair is that you need to wash hair in cold water to prevent the color from fading quickly. I also recommend using a keratin silver shampoo and conditioner set like this one to keep brassy color away, and hair bright and shiny. After a pretty uncomfortably cold shower, I was very happy with the texture of my natural hair. One major concern people have with intense coloring treatment is that it will alter their natural hair texture. I was thrilled to report my normal wavy hair was perfectly in tact thanks to the Olaplex at home kit.
Conclusion: Olaplex At Home Kit
Buying the Olaplex at home kit was the best investment I made in my hair to date. I know I wouldn’t have been happy with the choice to take on a vibrant magenta shade if I couldn’t do it safely. Olaplex certainly gave me the peace of mind that I was not trading healthy hair for a pretty pastel color. I used my No. 3 once a week when before washing my hair, and it feels amazing afterwards.
This treatment set is truly a revolution in the hair color industry, and I wish it had been around way earlier! I am so excited about the possibility of trying out even more fashion hair colors, knowing my locks will be kept safe with my Olaplex at home kit!