We try our best to take care of our feet, but with a busy beauty routine, they often get neglected. Whether your feet are dry, cracked, or you’ve got some pesky callus problems, you’ve probably wondered how to get rid of the issue quickly and easily! Fortunately, foot peels are here to combat any foot issue you’re facing! Check out our Baby Foot Peel Review to see how this easy to use product helps revitalize your feet without having to get a pedicure.
What is a Foot Peel?
Much like the skin of your face, the skin on your feet is made up of many layers. Sometimes these layers get damaged and we end up with dry skin, peeling skin, corns, and calluses. Baby Foot Peel works to remove the layer of damaged skin, revealing a layer of smooth, soft skin underneath.
Baby Foot uses 17 types of natural extracts, and it contains mainly fruit acids which are super gentle on skin. It also contains ingredients you’d find in a facial chemical peel such as glycol, and salicylic acids. These ingredients in the foot peel work to break down the layers of damaged skin, which will peel away following the treatment.
Baby Foot Peel Review

So does the Baby Foot Peel really do all it promises? Lets find out in our full Baby Foot Peel Review!
Step 1: Before The Peel
Before the peel, it’s really important to soak your feet. This softens the skin, and allows the ingredients from the Baby Foot Peel to penetrate your rough skin more easily. Some people suggest soaking in epsom salt (which I did), but regular warm water will do just fine if you don’t have any. Simply clean your feet, and soak for 15- 20 mins. Then just dry your feet and prepare them for the Baby Foot Peel.
Step 2: Put On The Baby Foot Peel Booties
As soon as you dry your feet off, you’ll want to place them inside the Baby Foot peel booties. Grab a pair of regular socks to keep nearby if you want to walk around the house while your wearing the foot mask. You simply place your feet into the masks, and you can trim away any extra plastic if it bothers you. The directions recommend leaving the mask on your feet for 1 hour, but I left it on for an hour and a half since my feet were pretty rough. Use your best judgement to see what works for your feet. After you remove the mask, wash your feet and dry them thoroughly.
Step 3: Soak Daily, And Play The Waiting Game
After your treatment, your skin may feel a little dry. I just kept my socks on, but some people suggest using lotion. I didn’t do this since my dryness was not severe, and I didn’t want it to delay the peeling process. Baby Foot suggests using an oil free moisturizer if you must. Everyday following treatment, you should soak your feet for 15 mins. Swap your daily shower for a bath, which should help speed up the results.
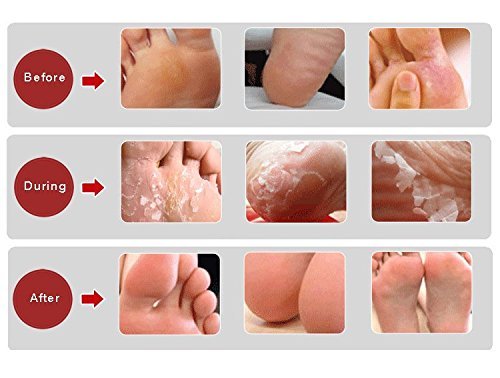
Most people begin to notice the dead skin separating at the heels within 2 days following the Baby Foot peel treatment. Once it starts to peel, try to leave it be until it really starts to get going. This will make it easier to come off in a larger layer. The directions say not to pick at it too much, but it really won’t hurt anything if you do. It just may take up a ton more of your time to do it little by little.
Step 4: Peel Away Dead Skin
After 4 to 7 days, the majority of your dead skin should be peeling off by now. Most of mine was gone within the first week, however Baby Foot suggests that it can take up to 2 weeks for it all to come off naturally. Obviously the more you soak your feet following treatment, the faster it will peel away! You can use a pumice stone or other foot tool help peel away skin, but it’s not needed and don’t overdo it. Following treatment, simply keep the skin clean and dry!
Step 5: Enjoy Your New Feet
I was amazed at how quickly it worked to remove my rough skin, without any visits to the spa. Soaking daily definitely helped speed up the process, but within 5 days, my skin was already softer and smoother, and the majority of rough patches had just fallen away.
The results are even more dramatic for those with calluses, corns, and cracked feet. Just remember to use your best judgement, and never try a foot peel if you’ve got open sores or any bleeding on your feet. You’ll be so pleased at how easy and pain-free this process is, it’ll be hard to wait for your next Baby Foot peel treatment. While this is not a replacement for a professional pedicure, I’ve found it can definitely extend the time between your spa visits dramatically.
Hope you found this Baby Foot Peel review helpful!