Keratin treatments started out as an expensive salon treatment option for people seeking straighter, more frizz free locks. A single treatments could go for $300+ dollars. Now there are many amazing options to perform a Keratin treatment at home, and in the comfort of you own bathroom. They also come at a way lower cost per treatment. A common concern for people is making sure they are following all the steps so that they get the best results from their Keratin treatment at home. Keep reading to find out how to do a keratin treatment at home and achieve amazing results!
How To Do A Keratin Treatment At Home
Following the detailed instructions to carry out a keratin treatment at home doesn’t have to be a daunting task. It is a relaxing experience as long do your research beforehand. While there are many options for a Keratin treatment at home, choose carefully. Pick one that is free of strong chemicals like formaldehyde, and choose one that you can wash out the same day. Some treatments require you to not rinse you hair for 3 days, and nobody has time for that. This is why we chose the Amazonliss Brazilian Keratin Treatment by Nutree!
What Do I Need To Do Keratin Treatment At Home?
Being prepared is essential, you don’t want to get halfway through your application and notice you’ve forgotten to grab something! Make sure you’ve got all you supplies together before you begin. Here is what you will need to get the best results from your Keratin treatment at home:
- A pair of latex gloves- these black gloves are used for dye, and hold up very well.
- A Blow dryer with a “cool” setting
- A Flat Iron with ceramic or tourlamine coating that reaches at least 410 degrees fahrenheit
- 8-10 hair clips to section the hair out. You can use hair elastics but I much prefer the ease of the clips for this treatment.
- A set of combs with a one fine tooth, and one wide tooth comb
- A well ventilated area, with a shower or sink to perform your treatment. A large bathroom with a window is perfect. Due to the strong fumes, you can also wear a hospital facemask that covers your nose if you are easily bothered by strong smells.

- The Keratin Treatment Kit itself. We will be using the Amazonliss Brazilian Keratin Treatment by Nutree. The 1 liter kit can perform 18-20+ treatments! The Amazonliss kit includes:
- Anti Residue Shampoo- helps get hair stripped of any residue before applying treatment.
- Brazilian Smoothing Treatment- the smoothing serum that will bring you silky smooth hair.
- Intensive Repair Mask- provides hair with maximum hydration to extend the smoothness of the hair treatment.
Keratin Treatment At Home Step By Step
Now that you’ve gathered all your supplies together it is time to begin! Make sure you are all set up in your well ventilated bathroom, and make sure there are no children or pets present while you’re performing the treatment.
Step 1 – Wash Hair
Using your Amazonliss Anti Residue Shampoo, massaging into a good lather. You’ll want to leave on for 3-5 minutes before rinsing. If you’ve never done a keratin treatment before or your hair is especially resistant to hair treatments, it would be a good idea to repeat the process, washing a second time and making sure you rinse all the shampoo from your hair before moving on to step 2.
Step 2 – Dry Hair
Using your blow dryer and your hands, dry your hair until its about 85-90% dry, but just still slightly damp. You can use your blow dryer on a medium heat setting here.
Step 3 – Section Hair
Part your hair straight down the middle from the front to the back of your head. Taking you clips, divide your hair into equal sections. My hair is long, so I typically do 4 sections on each side of my head (8 total). Take each section and wrap it tightly before clipping it so that it doesn’t fall or get in your way during the application process!
Step 4 – Applying Smoothing Treatment
Grabbing the first section on one side of the base of you head, apply a dime sized amount to the upper and lower parts of the section of hair. Comb strands from root to ends using a fine toothed comb. Add more smoothing treatment if necessary. The idea here is to make sure all the strands are evenly coated without being over saturated. It is always better to start with a smaller amount and add as you go so that you’re not wasting product. Once you have coated the first section of hair, twist it and pin it back into place using hair clips. Repeat all the steps for the remaining sections of hair until you’ve coated all your hair with the Amazonliss Brazilian Smoothing Treatment.
Step 5 – Dry Hair Again
Using blow dryer on “cool” setting, begin to blow dry each section of your hair. Make sure you don’t use a normal heat setting while blow drying this time. You should not brush the hair while blow drying, but you can use your hands to hold out strands as you dry them. Make sure your hair is completely dried before moving onto the next step. You can also let you hair air dry at first and then finish up with the blow dryer if you prefer.
Step 6 – Flat Iron Hair
Take your flat iron and set it between 390-410 degrees. If your hair is delicate and color treated, keep it at 390, but if its pretty healthy kick the heat up to 410. Make sure your hair is divided into equal parts while you are waiting for the flat iron to reach temperature. Take your first section on hair, and flat iron it from root to ends, about 8-10 times. Its a good idea to place the flat iron perpendicular to the scalp at a 90 degree angle, starting at the roots. This will give you the best results from straightening. Its important to be very thorough here, and get hair as straight as possible in order to get the longest lasting results. Once you’ve finished the first section, move onto the rest of your hair until its all nice and straight.
Step 7 – Rinse Hair
Once your hair is nice and straight you are ready to rinse it. It may still feel hard and cake-y from the treatment being flat ironed into the hair. Rinse your hair with luke warm water, and massage scalp to make sure you’re getting all the treatment out of your hair and scalp. I would keep my gloves on until this point, but you can remove them prior to rinsing if your prefer. Towel dry your hair a bit to remove most of the moisture before moving onto step 8.
Step 8 – Apply Intensive Repair Mask
After your hair has been rinsed of the treatment completely you are ready to apply the Amazonliss Intensive Repair Mask. Apply a generous amount to hair, and maek sure all your strands are coated from scalp to ends. Allow the Intensive repair mask to sit on hair for about 30 minutes. You can wrap hair in a towel or showercap during this downtime, and move about until you’re ready to rinse it out.
Step 9 – Rinse Hair Again
Now its time to remove all the Intensive repair mask from your hair. Using lukewarm water, rinse hair throughly until you’ve removed the treatment and you are left with clean hair.
Step 10 – Blow Dry Again
Gently blow dry your hair out as you would normally. It is okay to use heat at this stage, but use the lowest heat setting you can get away with here. I work in sections to blow out my hair during this step, but blow dry it however you usually do. You’ll notice straight away that you hair texture will be less frizzy, and your hair will dry much more quickly than it typically would before the performing the Keratin Treatment at Home. Depending on the texture of your hair before the treatment, you may be happy with the way it looks after a blow out, or if you prefer a more sleek/ straight look you can flat iron your hair until you’ve achieved your desired look.
Step 11 – ENJOY!
Your hair will now be smoother, silkier, and less frizzy! I was amazed at how smooth and silky my hair was, and I could not tell any difference between my hair after having a keratin treatment done in a salon vs. the keratin treatment at home using Amazonliss in my own bathroom! I usually style my hair and do not wash it for 3-4 days after performing a treatment. When washing following the treatments, make sure you are using a sulfate free shampoo and conditioner. Amazonliss makes their own after treatment set of shampoo and conditioner, but any brand that is sulfate free is fine. Keeping sulfates out of the hair will keep your hair from returning to its previous texture as quickly.
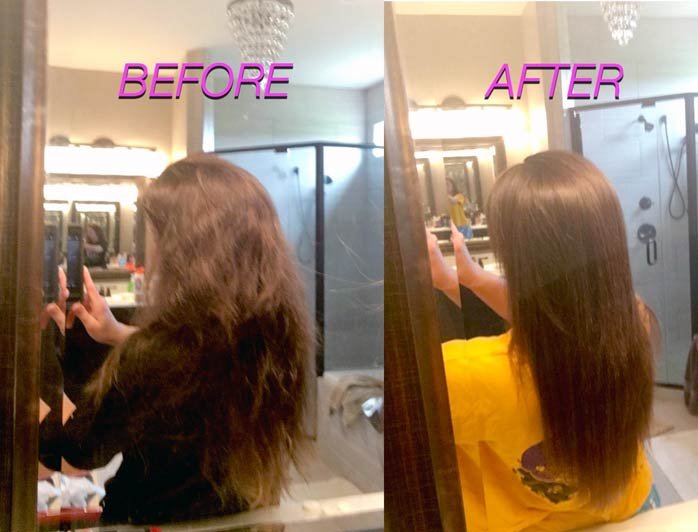
Try to resist the urges to touch your new smoother hair all the time, because it will also help your style to hold longer. I have naturally wavy/curly textured hair, and with the Amazonliss Brazilian Keratin Treatment, my hair stayed smooth and straight for about 11 weeks. It was so nice to have smooth silky hair even after letting it air dry. I also noticed that my hair was much easier and quicker to blow dry, and looked great after a simple blow out. My style holds for much longer after using the Kertain Treatment at home, and I was so thrilled to be able to do this for a fraction of the price by myself!